Note: Photographers’ Friday is a weekly blog series directed toward professional photographers, and in some instances, serious amateur photographers. All Photographers’ Friday blog posts will assume that readers have a basic working knowledge of digital SLR cameras, but if you’re left with questions or don’t understand any of the information, don’t hesitate to ask. We love e-mails!
—
For a short phase early in our photography career, Danny thought he wanted all our portraits to utilize off camera flash. It was a very short phase. We are, deep down in our sunshine-loving hearts, natural light photographers, so instead of bringing flashes with us into the great outdoors, we worked hard to learn how to make the light of the great outdoors work for us as beautifully as possible. Playing with natural light has kind of become our signature (stay tuned for Monday’s feature!). But there are times when natural light isn’t going to help you out as much as you need it to.
Case in point: Outdoor midday portraits when you have limited shade. Now, for a stand-alone portrait session, we avoid that type of situation like vegetarian avoids a burger joint. When we’re going to shoot a portrait session, we schedule it during the best light of day, in the early morning or late afternoon/evening. However — and this is a big however — we don’t get to schedule weddings. Shockingly enough, the bride and groom do that. Some plan their portraits around golden hour light, but when a couple has a midday ceremony, you can see that isn’t really possible. But it’s still our job to create beautiful photographs for the bride and groom.
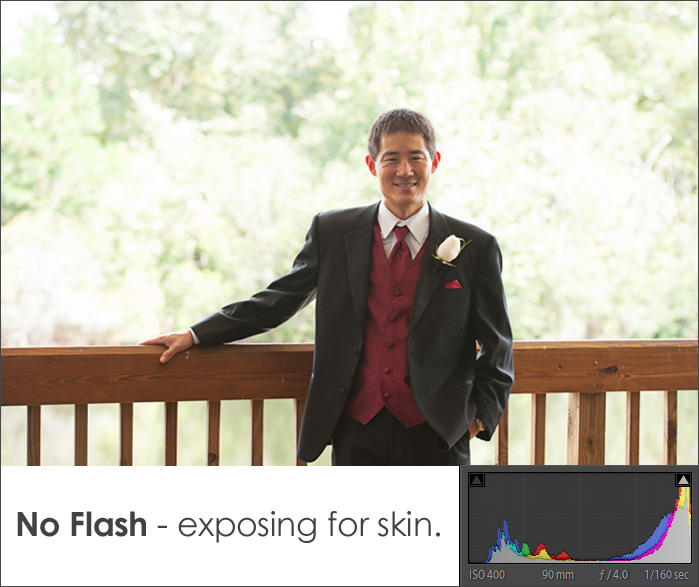
That was the situation at Tricia and Jonathan’s wedding last month, when Danny was the best man in addition to one of the photographers. The ceremony took place on a deep, strongly shaded deck overlooking a pond. Beyond the deck, there was a grassy lawn and a parking lot, but there was no pleasant shade where we could gather the family for portraits. The deck was our only option. But when I set Danny up and took a quick test shot, I realized this wasn’t a good enough option. Take a look.
If you notice the histogram, the bulk of the data is pushed abruptly off the right side of the graph, indicating a lot of lost highlights (blown out trees in the background) and the left side of the graph is not touching the left-most end, even though Danny has a black tuxedo on. There is too much data loss to reasonably fix this in post.
Would the bride and groom have been happy with portraits like this? I don’t think so. The background was completely overexposed in the harsh sunlight, and Danny’s face was still more shadowed than I liked. We made a quick decision to pull out one of our flashes — conveniently already set up inside for the reception — and pop a 1-foot-wide softbox on top. We use Paul C Buff’s CyberSync triggers/recievers to remotely fire our flash, but Pocket Wizards and Radio Poppers work as well. We don’t recommend the cheaper off-brand triggers you can find on eBay for jobs as important as weddings. We have also tried Nikon’s CLS system, using Nikon flashes to trigger other Nikon flashes, but it isn’t always reliable. To do off camera flash work, you’ll need some type of flash triggers.
(Quick note: This is the perfect example of why we like to do test shots on each other. We like to make sure we know what our settings need to be before we put our subjects in place — if we’re fidgeting with our cameras too long while they’re waiting, our subjects will get antsy and they’ll worry that maybe we don’t know what we’re doing, when in fact, we’re adjusting the camera settings because we know what we’re doing. But our subjects are always happier if they don’t have to be present while we’re making those adjustments.)
Our next step was to figure out how to balance the super bright ambient light with the fill light from the flash. First, we took a test natural light shot, metered so that the background was properly exposed. Then, we followed the same rule of thumb that we use when we’re photographing receptions: We set our flash to manual mode, and continued to take flash-lit test shots and adjusted the flash’s power until the red channel on our camera’s histogram (the red channel is the channel that contains flesh tones) just brushed up against the right side of the histogram. For receptions, we frequently underexpose the background even more, but that’s for another post.
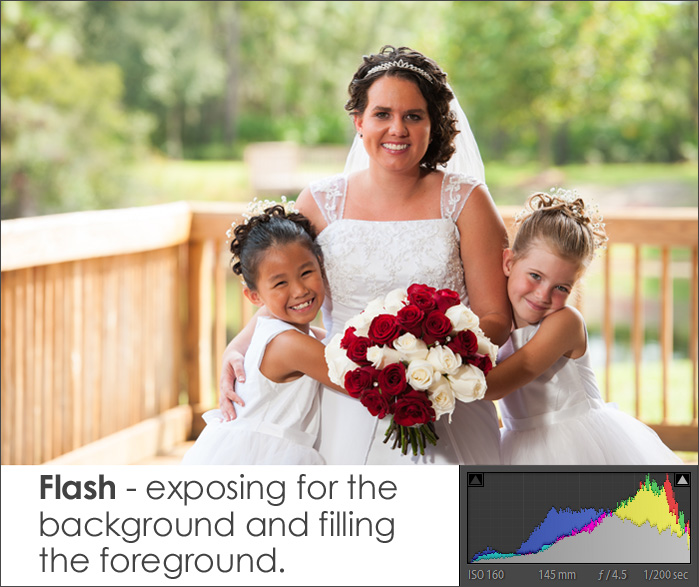
We raised the flash to about six and a half feet and put it 30 degrees to camera left so that the light streamed over our subjects at a nice portrait lighting angle, and — voila. The results were much, much better!
The histogram for this image is much more evenly distributed. The data is available in the darkest range (left side) since Tricia’s and the flower girl’s hair are both dark and while there is a little bit of clipping on the highs (bright fence rail), there isn’t much and the image still looks natural.
The background looks natural and the skin looks brighter — both of which are pretty important for wedding portraits! Of course, our preference is being able to get both the background and skin to look beautiful without flash, but we love these results, too. Having the flash ready and knowing how to use it quickly turned what could have been a really difficult portrait session into a breeze.
So, a quick rundown about using off camera flash for outdoor portraits:
- When: When the ambient light is too harsh for you to be able to expose both the background and the subjects properly.
- Where: Position the flash, with softbox or shoot-through umbrella, at a thirty degree angle to your subjects, about six to eight feet away, from a height where the center of your light source is just above eye-level.
- Why: To evenly expose the entire image; to allow you to produce excellent results in non-ideal lighting conditions and locations; to help you get through a session more quickly.
- How: Properly expose (or slightly underexpose) your shot in-camera. In manual mode (on your flash), use the red channel on your camera’s histogram as your guide to increase or decrease flash power until your subject’s skin is properly exposed (the red channel contains fleshtones and should be almost touching the right side of the histogram). You may need to adjust your flash’s power or move the flash closer to or father from your subjects to achieve proper exposure. (Don’t forget to take into consideration your camera’s max sync speed.)
I know this only scratches the very surface of a complex subject — and one that has taken us countless hours of research and practice to get as far as we have. But if there’s anything you take away from this blog post, I hope it is this: At a wedding, you never know what situations you might encounter as a photographer, and having the ability to whip out your off camera flash and use it confidently will be a huge asset on many, many occasions! Work with your flashes, even if it’s in your own living room at night. We have some great pictures of us dancing with our dog, beautifully rim-lit. And because we played around and took those silly pictures (over and over and over), we’ve learned how to produce the kind of results we want, in almost any situation, and under almost any time constraints. It’s hard work — but it’s worth it!
And just a quick shout-out: Most of our lighting techniques are derived from the methods used and shared by the amazing Zach & Jody Gray. Their blog, creativeLive workshops, and Harvest DVD have been invaluable to us.
Next Friday we’ll be going over our exact lighting setup for wedding receptions. See you then!
~ Laura + Danny
Most of my work has been in Photojournalism. I am now moving into Executive Portraits. Too scared to do weddings. I will check back often.
Perfect timing! I’ve been working on learning flash techniques and this was so timely and informative! You explained a very complicated issue concisely and clearly. Yay, you! Thanks for sharing your knowledge with us. As for the flash set up in the living room…just set mine up last night to play! Love the dancing dog idea…oh, Maggie, c’mere Maggie…